
Gun projects
hopefully I will build some cool stuff for this page, but for now, this is the first one built, or rather modified.
no, I don't hunt but I think this will be a great hobby, at the range as I learn better about it. I like the challenge at greater distances.

1st Gun
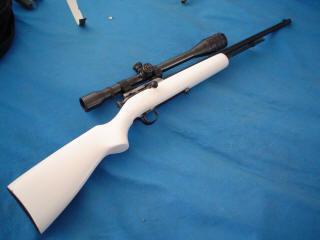
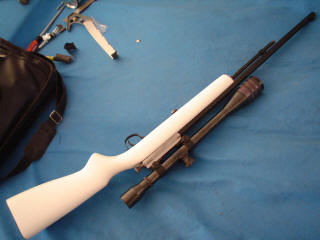
My buddy "Z" built this gun for me. its only a 22cal repeater, but I think its great. Good Color! I want to shoot it for the challenge so its a good size for me. Z took me out with his guns and I seemed to be able to shoot a pretty tight group, so I don't suck as bad as I had expected.
I am going to shoot as far as this thing is capable of, and we shall see how tight those groups are. I like big challenges, and this seems to be something that will take some effort.
I had to rebuild the top of the receiver, I welded a piece on and then cut out what I needed. the shell ejects very well even after all of this, and the safety even works.
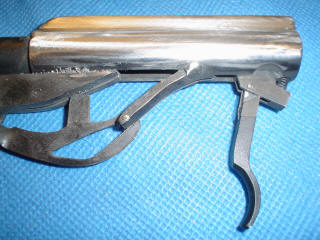
I had to weld a top plate on this gun and shape it a bit. everything works great, even the safety if very functional. The shells eject perfectly also. Z is going to buy a mill, so if he does, he wants to get into gunsmith. I think that I might try to build an aluminum stock for a gun and it might look pretty cool when completed.
You think that scope is overkill?!! its 20x.
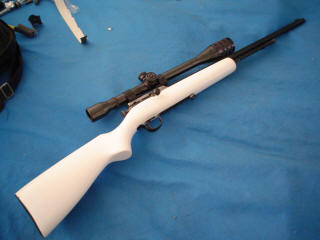
Man, its hard to see close targets with this scope, but I like it. It will be more useful in the future for a larger gun that is more capable of shooting further distances.
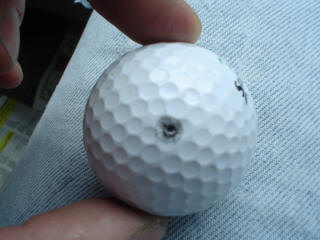
This is 2nd shot at 50 yards first thing in the AM still groggy. NICE! first one was right below it and made it bounce up about 5 feet. This gun seems to shoot very well! This is dead centre and bullet is inside of ball.
Ok, this is very weird. A box of ammo seems very strange. about every 4th shot was low and I seemed to be doing this consistently. Z thought I was a bit nuts, or making an excuse, until he tried himself, and same thing. then the strangest thing, one didn't even make it out of the gun, check this out.

Good thing we noticed, we had to push it out with a cleaning rod. I wrote Winchester and gave them the details just incase it is a bad lot.
Well, Z is building another stock. its pretty cool, it is custom and fits nice. I like his stocks. this one his father had started by cutting the basic shape, and then gluing rosewood for different colors. His father is passed away, and I liked him, so when Z is done this stock, it will be something I will keep forever. don't think its easy, Z had to cut and shape it quite a bit to even get it looking like a stock. Its coming along well.

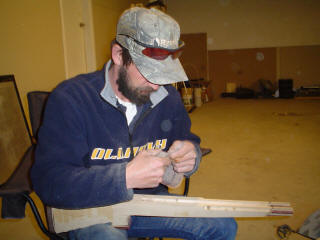

Just testing to see if cheek rest is correct, and also the grips.

LOOK at this!
My buddy "Z" helped me with this gun, Brand New!

|
|||||||||||||||||||||||||
This is a very affordable rifle. I tried other rifles that were allot more money, and to tell you the truth, the trigger felt worse on all the other rifles. I was not sure if this trigger would modify well, but it turned out with no creep, very little movement, and the trigger stop worked extremely well. It is unbelievable for this gun. I have the 10 round clip in my gun, but I rather have the 5 they list above for the simple reason of not having the clip protrude so much.

Its a Savage Arms. Yes, it is already modified. The trigger is about 1 pound, and I had to do some work so the clip worked better in the gun. The slide is breaking in nicely. Also I am modifying the stock a bit, I don't mind the synthetic stock at all and think I will keep it for some time before replacing it. I have one in mind in the future and it is very nice, but Z has the link and I will post it later.

We will be shooting for some groups soon, possibly this next weekend and I will post the results. It has been windy for quite some time so its been pointless to shoot for groups. I have been working on my windmill instead.

Modifications for the Mark-II
Well now, this thing has many modifications now. It is getting very awesome! I have to sort the pictures and I will update everything that has been done below. Right now is just a mess of pictures.
My disclaimer as follows.
Your gun is your responsibility. These are my modifications and they work great for me. The manual actually says not to modify any way, shape, or form. Read and follow the manual. If you try any yourself and it does not work, that was your choice and your screw up. I assume no responsibility for anything you do. If you don't know what you are doing, or if the modifications should be applied to your particular gun, get a professional to do it (gunsmith). Actually, always use an professional to service, or modify your gun.
The picture below are the extraction pins. This gun had a problem that every once in a while it would not extract. So what I did is to file the points towards the shell so they would grab further in. Then you bend the spring so its a little circle. When you put the spring back on, leave the extractors off first, start one edge of the spring under the flat side of the bolt and rotate around it. The notches in the spring point towards the back of the bolt. Then you push the whole thing around the bolt until the two sides line up to were they should be, then push the extraction pins in from the front of the bolt. This will allow the spring to retain its tension, if you do it any other way, it get soft on the pins.
I also filed a different angle on the silver extraction. its about 45 degrees both sides and now I have it about 30 degrees on the side of the bolt.


don't let the diagram below fool you, its out of the manual and they have the extraction pins shown backwards, nice! the points have be pointed inside like the drawing above.

Ok, bad drawing, but below, the bottom one, is not quite lined up in my picture, but just make sure they both grab exactly before the rim. Check each time you grind, and go only a little each time. Look from where the clip goes into the chamber and you can see with a bright light, exactly how it is grabbing the shell when you slide the bolt forward. Just put an empty shell into it before you do this. I saved the ones that had problems ejecting, so I could test with them. Once I was able to extract each time, I was done.


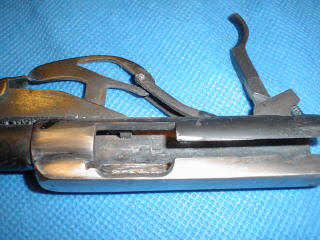
The next problem with the gun is the last shell seemed to not want to line up with the barrel. It would not feed into it. I noticed the housing around the clip was very loose so I used vise-grips to squish the two side together, then I tack welded it so it would not come apart again. It was a bit tight so I had to take a flat file to the inside, but now its perfect. I have very little slop in the clip. I also bent the spring a little in the clip so the middle of the spring had a larger curve in it, but kept the circle small. This seems to help push what play I have left out by moving the clip forward.
Below you can see the small weld. I think they will be fine if you don't weld it, I just wanted to be sure it was not going to work loose again.


Its hard to see, but you can tell that its been squared off by a file inside.

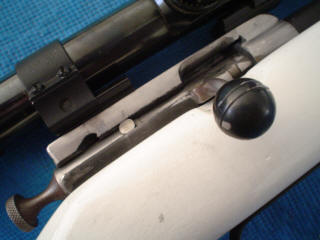
The next thing I wanted to change is to make the bolt a little easier. Where the small button on the bolt holds it when it is cocked, it has quite the notch in it. I rounded the notch out and curved the ramp towards it a bit more. this makes it very easy when you pull your bolt up, before sliding it backwards. I broke in the bolt with lots of lube also and it really seems to slide abnormally well. I should of taken pictures when I had the bolt apart.

You have to have your bolt apart for this step, I just show it with the center inside so you can compare to the above picture.


This picture is fuzzy but on the lever for the bolt, there is a 45 degree angle in it to help it when you pull it down to cock the gun. I filed this angle to a nicer one and wider. It is rounded a bit on both sides. This makes it so the bolt always seems to be in the right position before you cock it. It also it easier to move down as it is more forgiving if you are not exactly all the way forward with the bolt.

The stock is very light, actually the whole gun is, so I have added lead weights in the stock and them filled it with foam.
To strengthen the stock, I dug out all the little ribs in the front of it and placed a 1/2 inch re-bar into it. Then I poured fiberglass resin into it to hold the bar, and to stiffen up the front. The barrel cannot touch in any of the areas as it is all just lower of everything.

The next thing I am going to fix, is the barrel from the factory touches the first two inches. It is like this from the factory. I am sure this is not as critical, but I want it ALL free-floating. Instead of digging out the stock, I am going to use washers to raise the whole thing. I have already found on the gun that the back mount needs 5 small washers as the back screw tends to push the stock in until it will actually touch the mount. So I will add one washer there making it six, and one in the front. This should keep the barrel free-floating just by a hair.
Well it worked, the barrel is free-floating right to the end. I screwed up a bit though, I didn't have enough hardener in the resin, so it was a bit of a mess. I got it done though and I should tell you, the gun is quite a bit heavier. It feels like a heavy barrel rifle now.
It weighs 7.5 pounds, I am sure this scale might be a bit out...

Before you do additional trigger work, you need to shim the whole trigger assembly. you use pop can pieces for the shims. Start placing shims on the front and the back until the trigger feels good, but it can still cock. if you shim it too much you can tell by putting the safety on, playing with the trigger, then click the safety off. If the trigger goes off, then take a shim out, you have too much. You will hit a maximum. Mine is about 5 shims.
![]()
I have to get pictures of the trigger work. It is down to a pound, no creep at all, and the trigger stop is very easy! My buddy "Z" figured how to do a trigger stop, and its all internal, with an adjustment! I also got rid of the side to side play in the trigger, if you are careful you can compress the two sides together, just until the trigger is snug, then work the trigger loose by forcing it softly side to side until it feels right. I changed my spring under the screw to a spring out of a pen. it was a bit smaller in diameter and fit the hole well. Try a mechanical pencil for proper size of spring, I got lucky!

You might have to play with the length of rod you use above, but when you have it, it will adjust very well. Tighten it until its snug, the trigger wont work at this point, then loosen it a 1/4 turn at a time until the trigger works.

When I figure out how to chrome stuff (another project) I want to chrome the bolt. For now it is good and its probably a good idea to break it in first, then I will chrome it. This should make it a bit tighter, but easy to slide.
So far all the modifications cost very little and they make large differences in the gun.
Well, this gun is a very nice one! it turned out very good and the modifications really changed everything. Night and Day! I did not feel any other gun in the store as nice as this one feels. You can really tell just by holding it and working it. I think all the bugs are out, but time will tell.
Well after some additional testing, the gun is GREAT! No more issues with it at all. The ejection is perfect so far, not one shell had a problem, seems to shoot well, and the bolt action is awesome, it slides very nice. "Z" says it feels like his gun, and his gun is an awesome one! $2500.00. Believe me, "Z" knows his guns too, so if he likes it, it passed the test.
Damn, one problem, I think I am running out of modifications!


