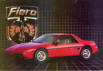
My Fiero (Convertible)
I love cars, so here is me.....a long time ago

This page is all Fiero's, I find these cars are miss-understood. They
are actually a very good car. The are so easy to work on, I can remove the
whole drive-train in an hour, and once you have the carriage out of the car, you
can work on anything. These cars are also one of the safest cars out
there. The ones that people say start on fire, are the four cylinder
versions, and that is an easy fix so it will never happen.

My car handles so well. It is a great car and parts are really cheap on
this car to replace them. The only thing I have never liked is the small
fuel tank, but it is cheap to fill!
This car started as a car that was stripped, and in many pieces in some ones
garage. The motor had blown and they took the car apart, never having an
interest in getting it together again. I had a running rabbit "VW" that I
traded because they just wanted a running car. they never lost any parts
or even one bolt though. pretty good!
I put the car back together, with the toasted motor, loaded it up with 20w50
and drove it for another year until I could afford to purchase a re-built
engine. I wanted to build a stroker for it out of a 3.1l engine, but the
starter would of been on the wrong side and this would of made the clearances
not work. so I just put a 2.8l engine back in. knowing now that a
3.1 block out of a Chevy truck would of been the right block. you have to
change the heads, pistons, into a combination that will work. if you do
this, you can use all of the stock intake, and everything else on the top of the
motor. Next time I will do this!
when I first made this car into a convertible, I just cut the roof off.
I wanted to see if possibly it would have enough strength in the uni-body.
well the first time I drove it, it twisted, so I had flat iron welded
underneath. it ties into the front of the uni-body, crosses, and then ties
into the back two places. you can see what I mean if you look under the
Fiero. inside I also welded along my door sill, from the front to the
back, but I had to get rid of the plastic panels. this turned out nice
because when I had the carpet placed, it covers the edges and you cannot tell
the frame is inside the car.
for a few years, I would get a 4-wheel laser alignment done just to see if
anything changed, and there was nothing.
the roof came after everything was completed, so all I did is have someone
build a roof, that was installed like a boat. it slides into a track,
across the front window, flips over and snaps down. it worked very well,
even in the winter. now that I lost the roof in the fire, I just don't
need to have one, I really have not missed it at all as I just drive another
vehicle on the bad days. I am not sure if I will build another roof.
I will be adding my own project including my own Fiero convertible that I
have built. It was damaged in a fire recently but I am fixing it up
again. The fire was not the car! Fiero's usually have a bad
reputation about starting on fire. NO. It was my garage that started on
fire, but my things are fixed up and now just the car has to be finished.
again. I had originally done ALL work myself to build this
car, so a paint job is not too serious.


Up in my house when I lived in Calgary. I had the soft
top on and wanted a picture with it in place. Not too often I have the top
on this car. Never now as I use my truck in the weather.
My car and bike,
both painted the exact same color. Looks pretty good! They are an
exact paint match.

Below are some pictures that I took recently. After the
fire damage, the car was written off because the paint was discolored, badly.
The insurance company even tried to have the paint polished and it would not
help. After years under a tarp, it was very dirty. I decided to wash
the car and to my surprise all the color was not there. man it looks
great! Weird!
Here is a bunch of pictures of my homemade Fiero
convertible, its a photo album.
When I get some time and money this year, I
think I am going to re-paint this car. I want to do some interior work on
it also. it was a very fun car and I want to get it back on the road
again.
| FIERO Manual-Transaxle Gear Ratios |
| GEAR |
1 |
2 |
3 |
4 |
5 |
Final drive |
| 1984 4cyl eco |
3.53 |
1.95 |
1.24 |
0.73 |
- |
3.32 |
| 1984 4cyl perf |
3.53 |
1.95 |
1.24 |
0.81 |
- |
4.10 |
| 1985 4cyl |
3.73 |
2.04 |
1.45 |
1.03 |
0.74 |
3.35 |
| 1985 6cyl |
3.31 |
1.95 |
1.24 |
0.81 |
- |
3.65 |
| 1986 4cyl |
3.73 |
2.04 |
1.45 |
1.03 |
0.74 |
3.35 |
| 1986 6cyl |
3.31 |
1.95 |
1.24 |
0.81 |
- |
3.65 |
| 1986� 6cyl |
3.50 |
2.05 |
1.38 |
0.94 |
0.72 |
3.61 |
| 1987 4cyl |
3.73 |
2.04 |
1.45 |
1.03 |
0.74 |
3.35 |
| 1987 6cyl |
3.50 |
2.05 |
1.38 |
0.94 |
0.72 |
3.61 |
| 1988 4cyl |
3.73 |
2.04 |
1.45 |
1.03 |
0.74 |
3.35 |
| 1988 6cyl |
3.50 |
2.05 |
1.38 |
0.94 |
0.72 |
3.61 |
| FIERO Automatic-Transaxle Gear Ratios |
| GEAR |
1 |
2 |
3 |
Reverse |
Final drive |
Code |
RPO |
| 1984 |
2.84 |
1.60 |
1.00 |
2.07 |
3.18 |
PF |
MD9 |
| 1985 |
2.84 |
1.60 |
1.00 |
2.07 |
3.06 |
CD |
MD9 |
| 1985 |
2.84 |
1.60 |
1.00 |
2.07 |
3.18 |
PF |
MD9 |
| 1986 |
2.84 |
1.60 |
1.00 |
2.07 |
3.06 |
6CD |
MD9 |
| 1986 |
2.84 |
1.60 |
1.00 |
2.07 |
3.18 |
6PF |
MD9 |
| 1987 |
2.84 |
1.60 |
1.00 |
2.07 |
3.33 |
7CPC |
MD9 |
| 1987 |
2.84 |
1.60 |
1.00 |
2.07 |
2.84 |
7PSC |
MD9 |
| 1988 |
2.84 |
1.60 |
1.00 |
2.07 |
3.33 |
8CPC |
MD9 |
| 1988 |
2.84 |
1.60 |
1.00 |
2.07 |
2.84 |
8PSC |
MD9 |
The ALDL connector
The ALDL connector is located just behind the cigarette
lighter trim plate between the seats. Remove both screws from the cigarette lighter trim
plate. Now you will see the ALDL connector.
  -------------            --------#--------
 / |M|L|K|J|H|G| \         | |F|E|D|C|B|A| |
 |O|-----------|O|         |O|-----------|O|
 | |A|B|C|D|E|F| |         \ |G|H|J|K|L|M| /
 --------#--------           -------------
[A] (Black) Ground
[B] (Green) Diagnostic terminal
[C] Air Injection Reaction. Pulled to ground. (if used)
[D] Service engine soon lamp (if used)
[E] (Red) Serial data [160 baud PWM]
[F] T.C.C. Pulled to ground. (if used)
[G] (Yellow) Fuel pump (+12V = "ON")
[J] T.C.C. Norm. +5V. Pulled to ground ??? (if used)
[M] Serial data [8192 baud] (if used)
The ECM connector
The ECM is located just behind the rear console pad
between the seats. Remove the console and you will find the ECM unit.
           J1                   J2
/---------------------||------------------\
|C16 - - - - - - - C01||A12 - - - - - -A01|
|D16 - - - - - - - D01||B12 - - - - - -B01|
------=---------=-----||-----=------=------
CTS = Coolant Temperature Sensor
EST = Electronic Spark Timing
EVRV = Electronic Vacuum Regulator Valve
GSS = Gear Selector Switch
IAC = Idle Air Control valve
MAP = Manifold Absolute Pressure sensor
MAT = Manifold Air Temperature sensor
OS = Oxygen Sensor
TPS = Throttle Position Sensor
VSS = Vehicle Speed Sensor
[ J 2 ]
A01 Fuel pump relay [A] (Switch to IGN)
A02 not used
A03 not used
A04 EVRV[B] (Solid state EGR control)
A05 SES (Switch to GND)
A06 +12V Contact (IGN)
A07 Up shift (Switch to GND)
A08 ALDL [E] (Serial data)
A09 ALDL [B] (Diagnostic terminal)
A10 VSS [U] (Input 2000 pulses/Mile)
A11 MAT [A] (Air temp input)
A12 GND system
[ J 1 ]
C01 not used
C02 A/C clutch solenoid (output)
C03 IAC [D] Coil B Lo
C04 IAC [C] Coil B Hi
C05 IAC [A] Coil A Hi
C06 IAC [B] Coil A Lo
C07 Waste gate bypass (input)
C08 not used
C09 not used
C10 CTS [B] (Input)
C11 MAP [B] (Input)
C12 MAP [B] (Input)
C13 TPS [B] (Input)
C14 MAP [C]/TPS [A] (Common +5V ref.)
C15 Fuel injectors 2-4-6 (GND switch)
C16 +12V Bat.[ J 2 ]
B01 +12V Bat.
B02 not used
B03 EST (0,76V) (Dist. gnd ref. low)
B04 EST control
B05 EST (Distributor ref. pulse input)
B06 not used
B07 not used
B08 A/C request input (Compressor)
B09 Power steering (input)
B10 GSS [A] (Park&Neutral input)
B11 not used
B12 not used
[ J 1 ]
D01 GND (Fuelpump[C]&GSS[B]&Park switch)
D02 not used
D03 not used
D04 not used
D05 EST (Ignition mod. bypass output)
D06 GND OS
D07 OS (Input)
D08 EVRV [C] (Solid state)(EGR diag. in)
D09 not used
D10 GND system
D11 not used
D12 TPS [C]/CTS [A] (Common GND)
D13 MAT [B]/MAP [A] (Common GND)
D14 Fuel injectors 1-3-5 (GND switch)
D15 Fuel injectors 1-3-5 (GND switch)
D16 Fuel injectors 2-4-6 (GND switch)
The ECM trouble codes
To retrieve this information from the ECM memory, you
must use a short jumper wire to ground the diagnostic terminal. With the connector exposed
to view, push one end of the jumper wire into the diagnostic terminal [ALDL pin B] and the
other end into the ground terminal [ALDL pin A].
When the diagnostic terminal is grounded with the ignition "ON" and the engine
"OFF", the system will enter the 'diagnostic mode'. In this mode the ECM will
display a "Code 12" by flashing the 'Service Engine Soon' light, indicating that
the system is operating. A 'Code 12' is simply one flash, followed by a brief pause, then
two flashes in quick succession. This code will be flashed three times. If no other codes
are stored, 'Code 12' will continue to flash until the diagnostic terminal ground is
removed.
Code 12 => No reference pulses to ECM (Diagnostic
mode)(never set)
Code 13 => Oxygen sensor circuit (open circuit)
Code 14 => Coolant sensor circuit (Low voltage / High temp)(open)
Code 15 => Coolant sensor circuit (High voltage / Low temp)(ground)
Code 21 => Throttle position sensor (High voltage)
Code 22 => Throttle position sensor (Low voltage)
Code 23 => Manifold air temperature (open)
Code 24 => Vehicle speed sensor
Code 25 => Manifold air temperature (Low voltage)(ground)
Code 31 => Turbo over boost, limited by MAP
Code 32 => EGR system, missing feedback
Code 33 => MAP sensor measured too high
Code 34 => MAP sensor measured too low
Code 35 => IAC Idle speed adjust failure
Code 41 => Cylinder select error (ROM error)
Code 42 => Electronic spark timing
Code 43 => Electronic spark control/Knock sensor failure
Code 44 => Lean exhaust, O2 measured too low
Code 45 => Rich exhaust, O2 measured too high
Code 51 => PROM sum check error
Code 52 => Fuel CALPAK PROM uninstalled
Code 53 => System over-voltage
Code 54 => Fuel pump relay failure
Code 55 => ECM failure


 [ Fiero ]


